A single Mobile Data Collection Tool vs adopting standards

I just left GeOng 2016 in Chambery which was a really good conference with lots of interesting workshops and presentations.  However I want to comment on one of the final sessions, the subject of which was “Response-effectiveness of new analysis tools for humanitarian professionals”.

In one segment of this session Anwar Mahfoudh from OCHA/Kobo argued for the complete elimination of the “proliferation” of Mobile Data Collection tools used by Humanitarian agencies.  He argued all not for profits and NGOs should use Kobo (maybe there might be some very small usage of “legacy” tools as well).    The rationale was to reap the benefits of standardisation such as lower costs since every data collector everywhere in the world would be familiar with the same tool.

OK I need to declare a small conflict of interest here; if this happened that would mean no more Smap for humanitarian agencies.

Anwar was arguing for standardisation, which is a good thing, he was just arguing for standardising on a tool rather than on the interfaces and processes.  Tools come and go; standards should last much longer.  After all, AOL and Netscape are not so common nowadays, and yet the underlying standards that they and the rest of the World Wide Web were based on have continued to evolve.  Fortunately two of the other panelists in the session,  from UNHCR and ICRC, both made this point and rejected the mono-tool approach.

Some useful standards could be:

  • xlsForm and the ODK XForm standard to allow forms to be moved between tools.  Even where an MDC tool does not support ODK natively they can implement these as an import/export.
  • Use of HXL to facilitate consistent interpretation and comparison of results gathered by different tools
  • The koboToolBox API.  Smap partially implements that so if you are pulling data automatically out of Kobo you can use the same interface to get it from Smap.

Hopefully OCHA/Kobo will soon switch to arguing the functional merits of their own tool and adoption of standards rather than seeming to argue that technical competition is a bad thing and won’t lead to better results for the community.


Version 16-07

New Features

Managed Forms

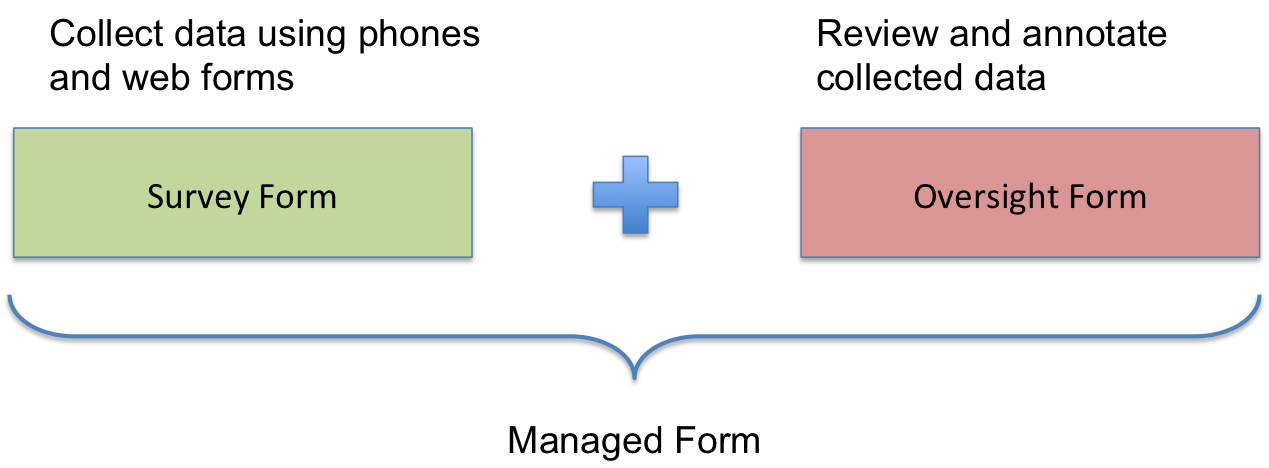
A managed form is created by adding an “oversight form” to a “survey form”.  Data in the oversight form can be updated from the user’s web browser to allow them to add additional information to the survey data.

mf

This feature should be useful in cases where individual records from a survey are significant and need a response.   In contrast where data is aggregated and analysed statistically managed forms do not add any value.

Demo

Setting up a managed form

  1. Create an oversight form
  2. Link the oversight form to a survey form
  3. Open the managed form

Create an oversight form

Select the menu modules > manage > setup managed forms

Then select the tab “Available Oversight Forms”.  You can then download the oversight template, define your form and upload it.

setupmf

Link the oversight form to the form

Select managed forms.  Then click on the edit button next to the name of the form you want to link.  Then specify the oversight form.

Open the oversight form

Select Modules > “Web Forms” > “Managed Forms”.

Export Results in xlsx and xls format

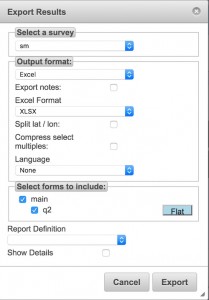
Previously when you exported results as an XLS file the format was actually HTML.  However this HTML could be read by Excel or LibreOffice.  Now you can export as an actual XLSX or XLS format as well as still exporting in an Excel compatible HTML.

excel

After selecting an output Format of “Excel” select the “Excel Format” you want.  The default is “HTML”, just because that is the format previously used however it probably makes more sense to choose xls or xlsx.

Other Changes

  • Export PDF templates in Arabic.
  • Set the threshold distance at which fieldTask will record a GPS point
  • Warnings are no longer shown after uploading an xlsForm template.  They added little value and were mostly confusing.
  • Removed the storage of survey “path” names from the database. This change should increase the robustness of the online editor.

Patches

v16-07-04

  • Management forms can now update data collected using a data form.  To do this specify the same name for a management form column as is used in your data form.
  • Fixed an issue that prevented “preload” question types from being downloaded when exporting an edited survey to an xlsForm.

v16-07-06

  • Added security roles.  You can now create roles in the user management page and assign them to users. This requires you to have the Security Manager or Organisational Administrator security group
  • In a managed form you can now specify that a select list is made up of users who have a role.  Multiple roles can be specified.
  • Fixed some security issues.

Smap is on the move

Smap Consulting now has a permanent company address in Canberra.  However one of the objectives of this move is to allow a more flexible physical location.  So although the company will be located in Canberra we may be working out of co-working space in Manila or Nairobi etc depending in the work we are doing and the location of our customers.

The company address is now:

PO Box 4644
Kingston,
Canberra, ACT, 2604
Australia

Our current physical location is at Brainspace a co working space in Kingston.

[osm_map_v3 map_center=”-35.316,149.142″ zoom=”14″ width=”100%” height=”450″ post_markers=”1″]


SPSS now available as an export option

You can now export data for import into SPSS.  This complements the existing formats of:

  1. xls
  2. csv
  3. kml
  4. shape
  5. Stata
  6. Openstreetmap

On the Smap server go to the analysis module and select “Export”, then select SPSS as the format. A Zip will be downloaded containing a CSV file for the data and an SPS file for the variable names.

Within SPSS import the CSV data file. Then load the variable names by selecting:

File > Open > Syntax

Then select:

“Run All”

Any suggestions on improvements to the information that is written to the SPS syntax file would be gratefully accepted.

Map Quest no longer support tile access

What is it with map providers! You may see something like this when you open a map view:

1468270992221

The changes Map Quest have put in place mean that they no longer support OpenLayers which is the mapping API that Smap uses in many places on the server. fieldTask is also affected.

More details on their announcement here: http://devblog.mapquest.com/2016/06/15/modernization-of-mapquest-results-in-changes-to-open-tile-access/

There is an updated version of the Smap Server to address this problem available on the downloads page.  http://www.smap.com.au/downloads.shtml

A fix for fieldTask should be available soon.

Google Map Keys Are Back

From the 22nd June 2016 you once again need an access key in order to use the google maps API.  This is a return to the situation as it was before version 3 of Google Maps.   However this change currently only applies to new web sites which is why I hadn’t noticed it up until now.

Smap does not use the Google Maps API directly to draw maps, instead we use Openlayers and Mapbox, however we do use it to retrieve google street maps and google satellite base maps.  If you have recently installed a new Smap server you may find these base maps no longer show up.

The problem has been addressed in version 16.06.11 of the Smap Server which is available from the downloads page of the Smap website.  This version has an extra tab on the users page labelled “Server”.  You will need the “Organisational Administrator” role to see this tab.

server

To get the google maps back you only need to set the google maps key. However you can also set the server level mapbox key and email configuration from this tab.

Version 16-06

New Features

Online Editor

1. Info Dialog

There was a problem with the editor in the previous release that it would not show that you had created a new form that shared a table with an existing form.  An “info” dialog has been added under the “file” menu to show this sort of information.

info

Info Dialog

The “Based On” text in the dialog shows the survey name and the form name that the new survey was based on.  These names are separated by double colons “::”.

2. Make questions read only

You can now make questions read only or convert them to writable when in the online editor.

Referencing data from other form

1. Specify a unique key for each record

Previously the only unique keys associated with a record of data were generated when the data was collected.  These are the “prikey” and the instanceId.  However if you then edit the previously collected data new versions of these keys are created.   Now you can specify a “Human Readable Key” as a combination of answers to questions in the form plus an internally generated number to make sure it is unique.   Its these questions from the form that make the key “Human Readable”, for example a key could be “Zambia-2016-11”.  This key will not be changed if the data is edited.

2. Link a question to data in another form

In the online editor you can specify that a question links to a “Human Readable Key” (HRK) in another form.  Then if you answer that question by entering an HRK the data can be linked in reports.  For example you may have a form that maintains assets and another form to report a fault.  If you enter the HRK for the asset into the form recording a fault then reports can be created on the faults per asset.

You can enter the HRK as a text question, using a Barcode question or a select_on question.

3. Referencing data collected by other forms

Previously it has been possible to load CSV files containing data that can be referenced, or used to create choice lists, while filling in a form.  It is possible to:

  1. extract previously collected data
  2. edit it into a suitable CSV file
  3. Then upload that CSV file for use by another survey

This new features simplifies that whole process by allowing you to reference other surveys instead of CSV files.  The latest data is then automatically extracted when you refresh fieldTask.

Browse Results

The results browser is available from the webforms module. Features include:

  1. Select the columns to show
  2. Filter on all “select one” type questions
  3. Search for text in the results

View Logs

It is now possible to view logs showing various events such as deleting or erasing forms and also viewing the data in forms.

Access the log by selecting the new module called “manage”.  There should be a high volume of logs generated, you can sort them and filter on survey name, user and event type.  You can also do a text search.

Bug Fixes

  1. Smap Uploader was failing to upload data using https.
  2. If no data had been submitted for a survey then a blank survey template could not be generated.

Version 16.05

New Features

A better “download the form” dialog

When you select the download button next to a form name on the form management page you will see a dialog asking what you want to download.   You can often download either of two versions of the form template as an XLS file.

  • The original XLS file uploaded to the server
  • The latest version of the form including modifications that you have made using the editor on the server

These two choices are now a little clearer.

download

The first choice is now the latest version of the form.  Next to the choice is the current version number.  The second choice is now the original XLS file, however if no XLS file was loaded then this choice will not be shown.  The version number for the original XLS file will always be “1”.

Logon button on the home page

You can now login and also logout from the home page.  The menus that you will see on the home page change according to your role and whether or not you are logged in.

Improved Task Management (Hosted Servers Only)

A new improved task management page has been added.  This is only available on hosted Smap servers and won’t be available in the download version.  New features include:

  • Import / Export of tasks to an XLS file
  • Viewing tasks on a calendar

tasks

Version 16-04


Features

New Features

Required Message

You can now specify a message to be shown to the user if a question is “required” and they try to skip it.  Enter the message in the column with a heading “required_message” in the survey template. (update) You can now also add the required message using the editor.  Select required as the attribute you want to modify and enter the message next to the button that sets the question as required.

Take a new picture

When the user answers an “image” type question in fieldTask they normally have the option of taking a new picture or selecting a picture already on the phone.  Adding the “nochoose” appearance value removed the option of selecting an existing picture.  This capability has now been expanded to “annotate” questions.    To use this:

  • Create a question of type “image”
  • Add an appearance of “annotate nochoose”

In the previous version of Smap this would only work no normal image questions that did not have annotate.

Autoplay of Video and Audio

If you include video or audio as part of the question then you can set these to play automatically when the question is shown to the data collector.  This can be done in the XLS survey template by specifying “video” or “audio” in the “autoplay” column.  You can also specify this in the online editor.

Times shown in local time rather than UTC

If you delete a form and then view the list of deleted forms the name of the form will include the date and time it was deleted.  For newly deleted forms this time will now be in the local time of your browser.  Interestingly if you are discussing deleted forms with somebody in a different time zone then you will each see a different form name (at least the data/time part of it).

FieldTask 3.14 Included on the server

This is the latest version of fieldTask that is also available in the google play store.  Details on new functionality.

Other Changes

  1. Importing of data into a survey has been moved from the task management page to the analysis page.  To import data from a CSV file create a table view, open the “aside” and then click on the import button.