Category Archives: Uncategorized

Version 17.01

Version 17.01 is now available, it includes two new features:

  1. Editing of cascading selects and choice filters in the online editor
  2. Accessing records from another survey using pulldata

Choice Filters

You can now create and edit choice filters in the online editor.  This should be an important feature as even if you develop your form using the excel editor it is fairly common to want to add a few more choices to a cascading select after you have started collecting data.  The online editor allows you to do that as you can change the form without affecting the data already collected.

Cascading selects are a type of choice filter where the choices in a select_one question are determined by a selection made in a previous select_one question.  Because these are so common the editor provides extra support to simplify their use.

However if you need to do something more complex then you can use the custom filter option which has all the flexibility and power of available when you create choice filters in the excel editor.

The help page has more details.  You can also watch the following video which shows creation of both a cascading select and a custom filter.

Looking up data from another survey

Smap offers two functions that can retrieve data from CSV files:

  • search()  Returns choices for a select
  • pulldata() Looks up individual data items using a key

One of the features in Smap that has been there for a while is that you can get the system to automatically generate and update the CSV file from the data in another survey.  To do this specify the “file name” as “linked_” then the survey identifier that has the data.

However this was limited when it came to pull data:

  • the key could only be a single question in the survey that has the data
  • you couldn’t look up repeating data in the other survey, ie where there was more than one record that matched the key.

Both of these issues have now been addressed.  For example you may have a survey that has collected data on children registered at a school:

School   Class      Student Name

school class student
East A Fiona
West A Karen
West A Harry
West B Tom

If we then specify the key to look up this data as: ${school}_${class} and that it is a repeating key then the CSV file that is generated for lookups will look like this:

_data_key _count student
East_A 1
East_A_1 Fiona
West_A 2
West_A_1 Harry
West_A_2 Karen
West_B 1
West_B_1 Tom

The _data_key and _count columns are automatically created by the server.  The “student” column is there because there is a pulldata() function in the form that gets the answer to the student question.  Because there are many students in each class a row is created with a value for _count for each class.  Underneath that are rows for each student in the class.  The key for these students is the same as the class key with the addition of_1, _2 and so on.

To access this data from a form you can:

  1. Get the school and class from the user.
  2. Use these to look up the count for the number of students.
  3. Then in a repeat group add the value from position() to the school and class to get details for each student.

Details on how to do this are currently being updated in the training material.

Styling Forms with Color and Links

One of the new features available with fieldTask version 4 is the ability to add color and other styles to forms.  This feature was contributed to odk by Nafundi and you can find out more on their website.  https://nafundi.com/blog/posts/customize-odk-forms-with-fonts-colors-sizes-and-links/

If you want to try it out there is an example form, also created by Nafundi although I have made some minor changes to it.

Field Task Version 4

Field Task version 4 has finally been released.

Support for version 4.1.2 of ODK Collect

This adds a lot of great functionality provided by the ODK team.  Details on the new Collect functionality is available heres. https://github.com/opendatakit/opendatakit/wiki/Collect-Release-Notes.  Some of the main new features are:

  • Can select Google or OpenStreetMap maps as the base map for a geopoint question or the tasks map tab.
  • The Google base map can be chosen from; streets, terrain, satellite or hybrid
  • Custom map layers can be added.  These maps mbtiles format. They can then be copied into a folder under the “layers” folder in the fieldTask folder on the phone. Custom maps can be generated from floor plans of building or other images.

Task Map with Google Satellite Background

Using a custom map, created from the floor plan of a building, to mark out a polygon

Other features

Routing to tasks.  You can now select a task on the maps tab then select the Google Route button to create a route.

Version 16.12

Importing data from a file into a survey

  • Data can be imported into sub forms
  • Polygons and lines can be imported
  • Data can be imported from xlsx files as well as CSV files
  • A zip file can be exported containing
    • An xlsx file with all the data for all forms / sub  forms in the survey
    • Images, video, audio files from the survey
    • In a format that can be immediately imported into another survey or, after modification, back into the survey it was exported from
  • User, Deviceid, notes, start time, end time, original upload time are all exported and then imported into the new survey

The following video demonstrates how this now works:

Other Changes

Uniqueness of question names

Question names now need to be unique across the entire survey and not just within a single form. This is a point of difference between Smap and other ODK systems so you may find that some forms that work with a different ODK variant will break when uploading into Smap until you make the question names unique.

Option to remove ODK menus from fieldTask

Using fieldTask when you press the “refresh” button new forms that you have access to will be downloaded and results will be submitted.  Successfully submitted results will be deleted if you have the option set on the server to do this.  You can also start editing a form by selecting it on the task list page.  However the ODK menus to edit, delete, get forms and submit results are still available.

In the organisation settings you can now select an checkbox under fieldTask options to remove these menus simplifying the interface for the user.  This will also prevent the user from deleting un submitted results.

This feature requires fieldTask 14.02.

Option to prevent review of results on the phone

Previously a phone user could read the data collected in a survey and add comments after the survey was completed.  You can now set an option on the server in the organisation settings to prevent this.

This feature requires fieldTask 14.02.

Support for Ubuntu 16.04

If you are installing your own server the install script now works with Ubuntu 16.04. Ubuntu 14.04 is also still supported.

version 16-11 Accountability

Accountability

This version is the official release of the Accountability product that allows an organisation to manage feedback and complaints using Smap.

Accountability features previously released included:

  1. Use a form to collect feedback and complaints
  2. Specify a form to manage that feedback.   For example assigning it to someone, setting a priority adding comments.
  3. Assign the feedback to another Smap user. That user would get an alert when they logged in to the webforms page to tell them that they had feedback to process.

The new capabilities are:

  1. Charts.
  2. Sharing a notification to anyone, even if they do not have a Smap logon.

Charts

Charts are shown on the “Browse Results” and “Managed Forms” page.  You can export all the charts as png images in a zip file by clicking on the yellow export images icon at the top right of the data table.

Currently the following charts are created automatically:

Count of submissions by period

This shows the number of submissions over time.  Up to two dates can be selected. For example you can show the count of feedback received for each period and the count of feedback that has been actioned.

The period can be selected as day, month or year.
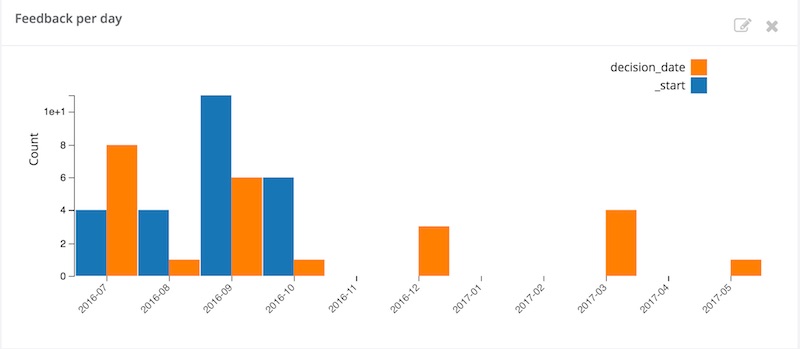
fbd

Duration of Interview

The time taken to collect the data is shown grouped by the answers to one of the questions.  The default grouping is by the user that collected the data.
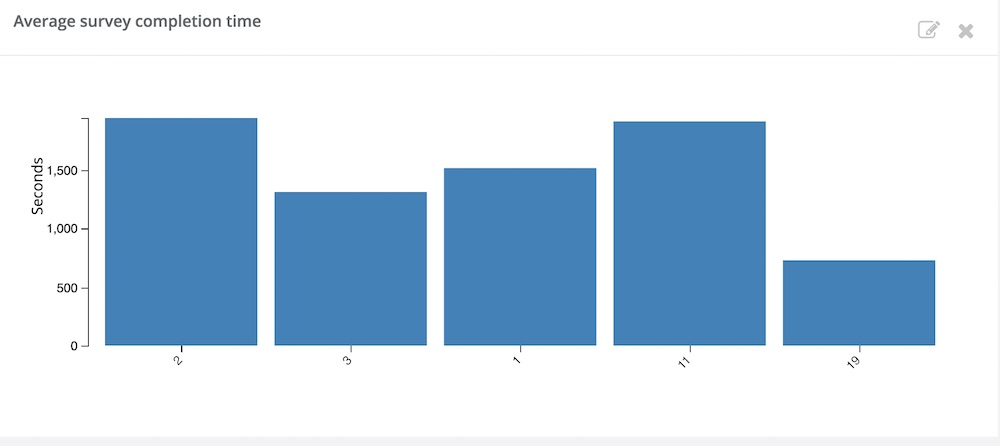
durn

Charts Generated per Question

Additional charts are generated for each question that is included on the browse results or managed forms page.  Note you can change the questions included by selecting the “settings” icon above the table of data.  settings

Each of these per question charts will show the count of submissions grouped by the data in the question.  Chart types include bar, word cloud and pie chart.

bar chart

bar

Word Cloud

wc

Pie Chart

pie

Sharing a Managed Record

You can now get a link to a record such as an individual complaint and then share it with somebody who does not have access to the Smap system.  If you click on this link it will take you to a page where response questions can be completed.

To get the link, click on the record that you want to share.  At the bottom right if the dialog click on the “Get Link” button.  You can then copy the generated link and paste it into an email.

If the survey has “roles” then these can be added to the link by clicking on the checkbox next to each role name.  Then click on the “share” button to update the link.   Note if there are roles associated with a survey then at least one role must be selected for the link to work.

Security of links to managed records

Links include a long series of random characters.  Effectively this means that they cannot be guessed and only someone who has been sent a notification will have access.  However a logon to the server is not required in order to access the notification hence anyone the link is forwarded to will have access.  Other security controls include:

  • Only the single record of feedback specified in the managed record link can be accessed using that link.
  • No other Smap server functionality or data can be accessed using the link
  • If the survey has “roles” to further restrict access to columns of data then these can be attached to the notification to apply that restriction.

Other New Features

Oversight forms can be exported to XLS

Select Oversight forms from the admin module. Then click on the “Available Oversight Forms” tab.  You can download an oversight form by clicking on the downward facing arrow next to its name.

Auto clean up of deleted Survey Forms

Forms that have been deleted for more than 100 days are now automatically erased.  This enhances security as the deleted data is no longer accessible.  The downside is that if you delete a form and then realise more than 100 days later that you still need access to the data you will be out of luck.

Bug Fixes

  • In the data cleaning module it was not possible to change an “other” text selection to be one of the choices of a select question.  This has now been fixed.  This feature now also works if you specify the relevance of the other question using an equals sign.  Previously it only worked when you used the selected() function.  For example a relevance of ${q} = ’88’  and a relevance of selected(${q}, ’88’) will both allow you to clean up the other text replacing it with choices where needed.

Version 16-10

The main change in this release is that managed forms have been improved and are now ready for production use.  Documentation is available here.  The Beta status has also been removed from the online editor.

Other Changes

Automatic “erase” of forms

A notice has been added to the home page stating that deleted forms will be automatically erased from the system after 3 months.  Deleting a form only makes it invisible.  You can restore it along with all of its data if you realise that you still need the data.  To permanently erase a survey you have to manually erase it.   However it seems that a lot of people are forgetting to do this which is a security issue as well as making the database larger than it needs to be.  Hence the automatic erase 3 months after deletion.  If you are deleting a survey which contains sensitive information you may still want to manually erase it straight away.  This new policy will take effect from the end of November 2016.

Include Maps in PDF Exports

When generating a PDF location, the answer to location questions are now shown on a map.

pdf

When location data is available then the map dimensions are generated automatically. If you are downloading a blank template then you will need to specify the map dimension in the appearance column of the form definition.  The appearance options are:

pdflocation_xxxx, where xxxx should be replaced by the longitude, latitude and zoom. For example:  pdflocation_121,14.6,16

pdfmap_xxxx, where xxxx should be replaced by the mapbox map to use.   The default is mapbox.streets

Filter by date when exporting results

Start and end dates can be selected when exporting results just as they can be for viewing results on the dashboard.

Filter results by the date they were uploaded to the server

In analysis you can now filter by the date the survey results were uploaded as well as start of survey, end of survey and date questions.  This is available when showing a graph, map or table on the dashboard. It has also been added to the new feature for exporting results.

HXL tags

HXL is the Humanitarian Exchange Language .  It consists of  number of tags that you can add to the second row of a spreadsheet of data that will help interpretation of that data when it is loaded into HDX. Tags look like Twitter hashtags, for example #sector to identify the column as containing the name of the cluster.

To specify the HXL for a column of data add the tag in the question’s appearance.  For choices in a select multiple the attribute “+label” is automatically added to the attribute.

The row of HXL tags will then be added to excel exports if you select the HXL option in the export dialog.

hxl

The major limitation of this current implementation is that the export data is raw data whereas HXL and HDX are mainly used with aggregated data.  The next release of Smap will include the use of HXL in aggregate reports.

Version 16-08

The major change in this release was the addition of “Roles” to control access to:

  • individual surveys
  • columns in a survey
  • rows in a survey

Only users who have “Security Management” group given to them on the user management page can set up roles.  The steps are:

  1. Create a “role” in the roles tab on the user management page.  This is just a name, any name.  For example we could create a role called “District 11”.
  2. Give 1 or more users that role.  To do this click on the user name in the “users” tab on the user management page. Then select the “District 11” role.
  3. Edit a survey to require this role.  To do this open the survey for editing and select the menu “Files” > “Roles”. Then enable the “District 11” role.

At this point only those users who have the “District 11” role will be able to access the survey.  This restriction also applies to administrators who will not be able to give themselves the role unless they are in the security management group.

To add column restrictions click on either “filter rows” or “filter columns” in the survey editor role management page (where you were in step 3 above).

The following video shows steps 1 to 3.

Accountability – Talk at GeOng 2016

Amos Doornbos and I gave a 5 minute lightning talk recently at the GeOng 2016 conference in Chambery.  The subject concerned using a Mobile Data Collection tool, such as Smap, as the starting point of a system to manage feedback and complaints.

These slides in google docs contain the content of the talk: https://docs.google.com/presentation/d/1qG_y_4DkZhmeM0B-X-Ibhtqume2jOyjdarOgV5yfdmI/edit?usp=sharing


A single Mobile Data Collection Tool vs adopting standards

I just left GeOng 2016 in Chambery which was a really good conference with lots of interesting workshops and presentations.  However I want to comment on one of the final sessions, the subject of which was “Response-effectiveness of new analysis tools for humanitarian professionals”.

In one segment of this session Anwar Mahfoudh from OCHA/Kobo argued for the complete elimination of the “proliferation” of Mobile Data Collection tools used by Humanitarian agencies.  He argued all not for profits and NGOs should use Kobo (maybe there might be some very small usage of “legacy” tools as well).    The rationale was to reap the benefits of standardisation such as lower costs since every data collector everywhere in the world would be familiar with the same tool.

OK I need to declare a small conflict of interest here; if this happened that would mean no more Smap for humanitarian agencies.

Anwar was arguing for standardisation, which is a good thing, he was just arguing for standardising on a tool rather than on the interfaces and processes.  Tools come and go; standards should last much longer.  After all, AOL and Netscape are not so common nowadays, and yet the underlying standards that they and the rest of the World Wide Web were based on have continued to evolve.  Fortunately two of the other panelists in the session,  from UNHCR and ICRC, both made this point and rejected the mono-tool approach.

Some useful standards could be:

  • xlsForm and the ODK XForm standard to allow forms to be moved between tools.  Even where an MDC tool does not support ODK natively they can implement these as an import/export.
  • Use of HXL to facilitate consistent interpretation and comparison of results gathered by different tools
  • The koboToolBox API.  Smap partially implements that so if you are pulling data automatically out of Kobo you can use the same interface to get it from Smap.

Hopefully OCHA/Kobo will soon switch to arguing the functional merits of their own tool and adoption of standards rather than seeming to argue that technical competition is a bad thing and won’t lead to better results for the community.


Version 16-07

New Features

Managed Forms

A managed form is created by adding an “oversight form” to a “survey form”.  Data in the oversight form can be updated from the user’s web browser to allow them to add additional information to the survey data.

mf

This feature should be useful in cases where individual records from a survey are significant and need a response.   In contrast where data is aggregated and analysed statistically managed forms do not add any value.

Demo

Setting up a managed form

  1. Create an oversight form
  2. Link the oversight form to a survey form
  3. Open the managed form

Create an oversight form

Select the menu modules > manage > setup managed forms

Then select the tab “Available Oversight Forms”.  You can then download the oversight template, define your form and upload it.

setupmf

Link the oversight form to the form

Select managed forms.  Then click on the edit button next to the name of the form you want to link.  Then specify the oversight form.

Open the oversight form

Select Modules > “Web Forms” > “Managed Forms”.

Export Results in xlsx and xls format

Previously when you exported results as an XLS file the format was actually HTML.  However this HTML could be read by Excel or LibreOffice.  Now you can export as an actual XLSX or XLS format as well as still exporting in an Excel compatible HTML.

excel

After selecting an output Format of “Excel” select the “Excel Format” you want.  The default is “HTML”, just because that is the format previously used however it probably makes more sense to choose xls or xlsx.

Other Changes

  • Export PDF templates in Arabic.
  • Set the threshold distance at which fieldTask will record a GPS point
  • Warnings are no longer shown after uploading an xlsForm template.  They added little value and were mostly confusing.
  • Removed the storage of survey “path” names from the database. This change should increase the robustness of the online editor.

Patches

v16-07-04

  • Management forms can now update data collected using a data form.  To do this specify the same name for a management form column as is used in your data form.
  • Fixed an issue that prevented “preload” question types from being downloaded when exporting an edited survey to an xlsForm.

v16-07-06

  • Added security roles.  You can now create roles in the user management page and assign them to users. This requires you to have the Security Manager or Organisational Administrator security group
  • In a managed form you can now specify that a select list is made up of users who have a role.  Multiple roles can be specified.
  • Fixed some security issues.